Category Archives: Christmas

Amaretti Tiramisu

Standard

Tiramisu
So Italian week continues and this time I bring to you something Dolce. What comes to mind mind when anyone thinks of a classic Italian dessert?  Tiramisu, of course! Every Italian restaurant has it on the menu and it’s a frequent visitor to our house. Not too many things work so beautifully together as strong espresso and silky smooth mascarpone. I call this particular recipe Instant Tiramisu because instead of traditional crisp Savoiardi ladyfingers that take a couple of hours to soak up coffee and liquor I used already soft amaretti cookies or Amaretti Morbidi. I absolutely adore these little cookies in Tiramisu. They bring beautiful almond flavour into the mix making it even more desirable and impossible to stop eating! Also, they are little round guys which makes them fit perfectly in the individual mason jars that I used this time.  A quick side note about the mason jars, they might not be the most original things as they get used a lot but for a good reason! They provide perfect personal portions and you can always pop a lid on them and stick them in the fridge until dinner time. Tiramisu One of the characteristics of true Italian cooking is very few but good quality ingredients. This Tiramisu recipe is no exception. Tiramisu (prep)
Ingredients: {Serves 4}

  • Amaretti biscuits (soft or crisp)-  20-24
  • Espresso or strong coffee- 2 shots/2 oz
  • Mascarpone-1 cup/250 ml
  • Whipping cream- 1 cup/250 ml
  • Icing sugar- 1/4 cup
  • Vanilla -2 tsp.
  • Rum or marsala, brandy etc.- 4-6 tsp.
  • Cocoa for dusting- 3-4 tsp.
  • Chocolate, shaved

Method:

Traditionally Tiramisu cream topping is made of mixture of mascarpone, sugar and egg yolks but using raw eggs could be unsafe so the eggs are often replaced with whipping cream.

Make two shots of espresso if you have an espresso machine or 2 oz of very strong coffee. Divide your amaretti cookies among 4 mason jars or glasses. Pour 1/2 of espresso shot in each glass over the cookies and 1 tsp. of rum.

Whip mascarpone and cream with icing sugar and vanilla until stiff peaks form, it will take about 5 minutes. Divide your mascarpone mixture evenly among 4 jars.Tiramisu (prep)

Dust with cocoa.
Amaretti Tiramisu
Or… Shave some chocolate using a cheese slicer or a knife.Tiramisu (prep)
And pile on top.Amaretti Tiramisu
I am still trying to wrap my head around how something so SIMPLE and QUICK could be pure Heaven.
Amaretti Tiramisu

Dulce de Leche Apple Pie

Standard

Dulce de Leche Apple Pie
Do you remember that episode of Friends where Monica goes through 10 batches of oatmeal cookies in attempts to re-create Phoebe’s grandmother’s famous recipe and fails?  Only to find out later that it was on the back of a Nestle chocolate chip bag all along!  Well, something similar happened to me when I was about to make this apple pie.
Here is how the story goes. My lovely mother-in-law has an amazing pie crust recipe that is called “No Fail Crust Recipe”. Her pies are so tasty and the crust is so flaky that my father-in-law requests a birthday pie instead of a birthday cake.  I always call her right before I need it and write it down on a scrap of paper, use it and lose it. Every single time.  The day before Canadian Thanksgiving I texted her asking for the recipe again! No reply. I so deserved that. Finally, I get a text, “Just Google Tenderflake pie crust recipe”. What!!! Her famous No Fail Pastry recipe is printed on every Tenderflake box.  For those of you who are not Canadian, Tenderfllake is a major Lard producer in Canada 🙂 and apparently the creator of the BEST pie crust.  The recipe they came up with is quite unique as it has a bit of vinegar in it and creates the flakiest pastry I’ve ever seen or eaten. As you break into your pie crust you can literally see layers upon layers. It’s phenomenal.

On another note, as much as I am a firm believer in butter, you just can’t beat lard when it comes to light and delicate pie pastry! Everything in moderation. 🙂Dulce de Leche Apple Pie
What is even funnier I’ve had a recipe card cut out of a Tenderflake box ages ago tucked into one of my cookbooks. All this time!
So the recipe I am about to share makes 3 9″ double crust pies which serves me just right. I usually make one pumpkin and one apple pie for the holidays and freeze the rest of the pastry for another occasion.
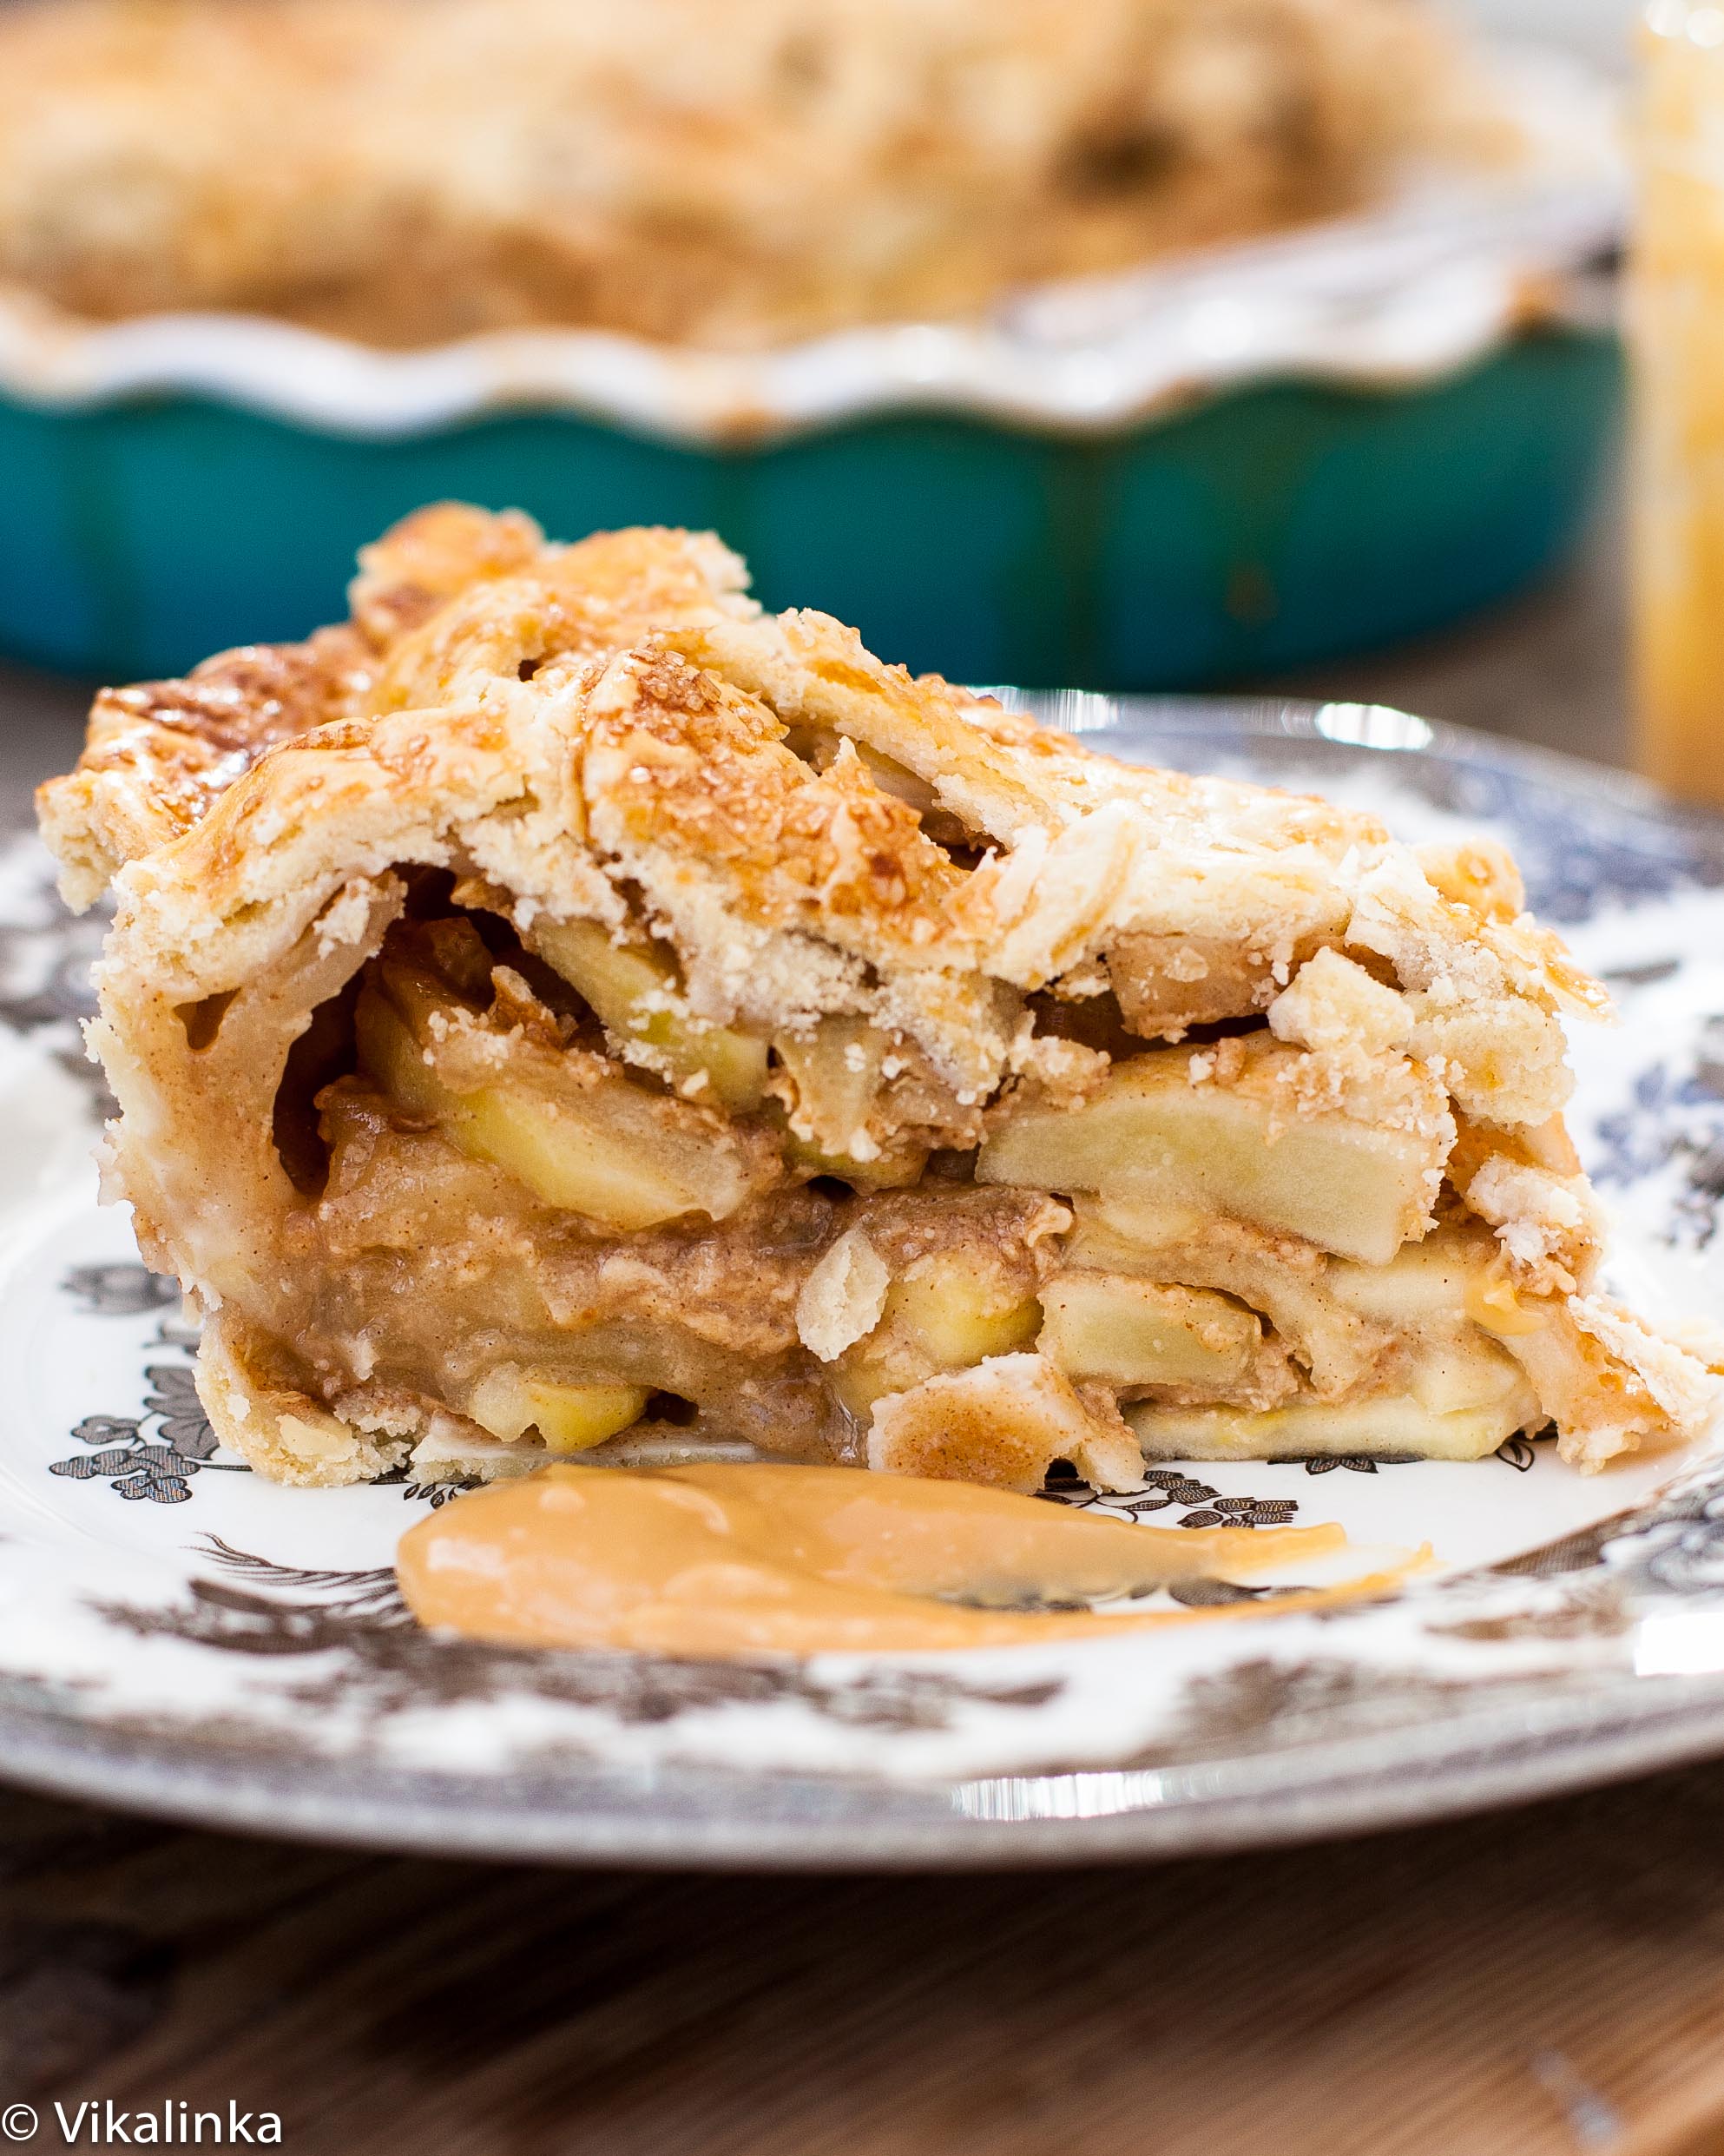
As you probably see from the pictures above I didn’t just make an ordinary apple pie. Not only does it have dulce de leche added to the apples but it also features a BEAUTIFUL top crust. Don’t worry it’s not difficult to make, in fact it’s easier than a regular method and I will show you exactly how I did it.
Dulce de leche Apple Pie
Ingredients {for the pie crust}: Yields 3 9″ double pie crusts or 6 pie shells

  • All purpose flour- 5 1/2 cups/1.4 litres
  • Salt- 2 tsp.
  • Lard- 1lb/454 gr
  • Vinegar- 1 tbsp.
  • Egg, beaten- 1 large
  • Ice cold water

Method:

  1.  Mix together flour and salt.
  2.  Cut in lard with pastry blender until mixture resembles coarse breadcrumbs.
  3. In 1 cup (250ml) combine vinegar and egg. Add water to make 1 cup. Gradually stir liquid into flour and lard mixture. You might need to add a little more cold water to make the pastry dough come together. Please, don’t overmix. If you think you have a perfectly shaped dough you’ve probably gone to far. 🙂
  4. Divide into 3 equal parts, wrap them in plastic wrap and put them in the refrigerator to chill or a freezer if you are intending to use some of them later.

Ingredients {for the apple filling}:

  • Firm Apples- 6 large
  • Sugar- 2/3 cup *See Note
  • Cinnamon- 1 1/2 tsp.
  • Dulce de leche- 1/2 cup plus extra for serving ** See Note at the bottom of the post on how to make dulce de leche
  • Flour- 1/4 cup
  • Egg, beaten- 1 ( for brushing on top)
  • Coarse Sugar- 1 tbsp. (I used Demerara sugar)

Method: 

Peel and core your apples and slice them thinly. In a large mixing bow combine sliced apples, sugar, cinnamon, flour and dulce de leche. Make sure dulce de leche evenly coats the apples. Lick your finger. Mmm…

Now let’s make that pie!

Method: {How to put your pie together}

Preheat your oven to 400F/200C

  1. Take your pie crust out of the fridge and cut 2/3 off. Roll it out on a floured surface, drape it on your rolling pin and carefully transfer your pie crust into the pie plate. Make sure your pie crust hangs over the edges a little bit which will help to bring bottom and top crust together.
  2. Fill your pie crust with the apple mixture.
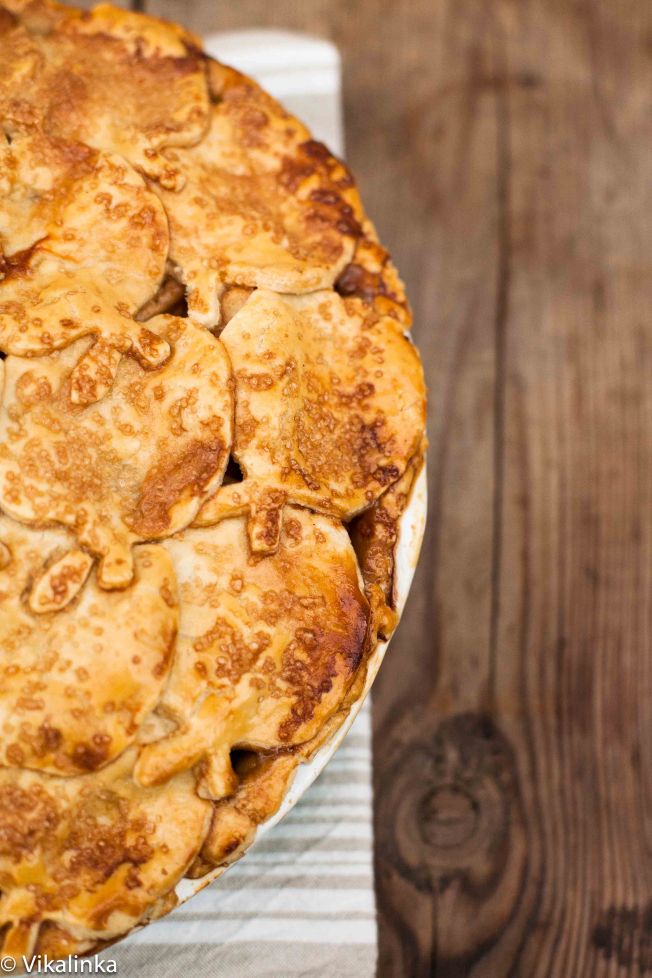
  3. Now the fun part.  Let’s get creative and make the top crust! Roll out the remaining pastry on a floured surface and cut out little shapes with a pastry/cookie cutter. I used my apple cookie cutter but you can you use anything you love that fits the autumn theme. 🙂 Dulce de leche Apple Pie (top crust prep)
  4. Brush the pastry that covers the rim of your pie plate with the egg wash and start placing the little pastry “apples” on the outer row making sure they are connected to the edges of the bottom crust, overlapping them slightly and brushing each circle with an eggwash to make individual cut out “apples” stick to each other and to give your pie an attractive shiny and golden finish. It’s okay to leave a little space betweens the pastry “apples” as it will act as slits and will allow the pie to ventilate while baking. Dulce de leche Apple Pie

Once you finished the first row, continue the same way until the whole pie is covered. Dulce de leche Apple Pie (top crust prep)

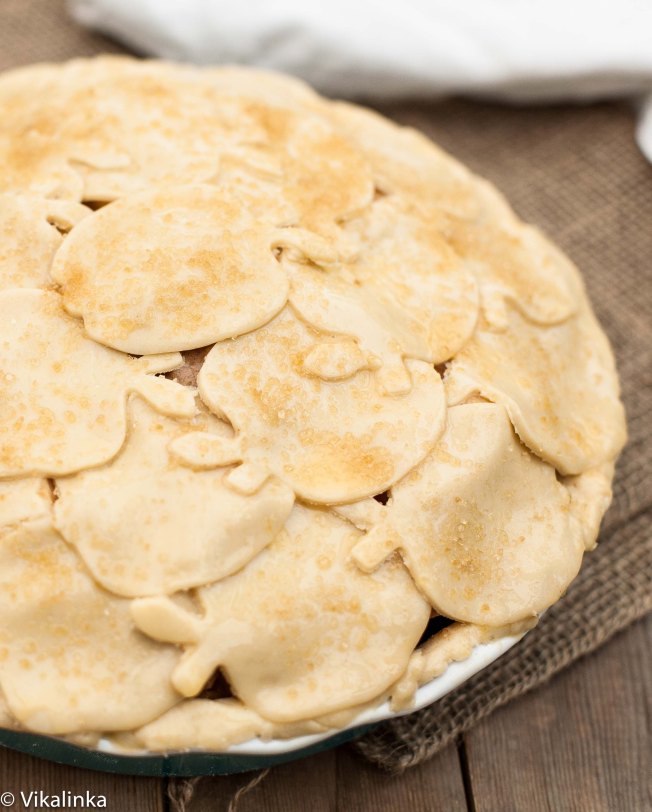
5. Don’t forget to brush it with the egg wash, it will seal all the individual bits of pastry and give your pie a beautiful golden colour. Sprinkle with 1 tbsp. of coarse sugar.

6. Put the pie in the oven on the lower rack and place a large baking sheet/pan to catch all the drips from the pie to eliminate a lot of mess in the oven.  Bake for 20 minutes then reduce the temperature to 375F/190C and bake for 40-50 minutes until the crust is golden and the apples are soft. If your apples are very ripe it will take less time to cook but it might take longer if your apples are not very ripe. In this case, loosely cover your pie with some foil and continue baking until the apples are tender all the way through. (Test with a knife for doneness, it should pierce them easily).

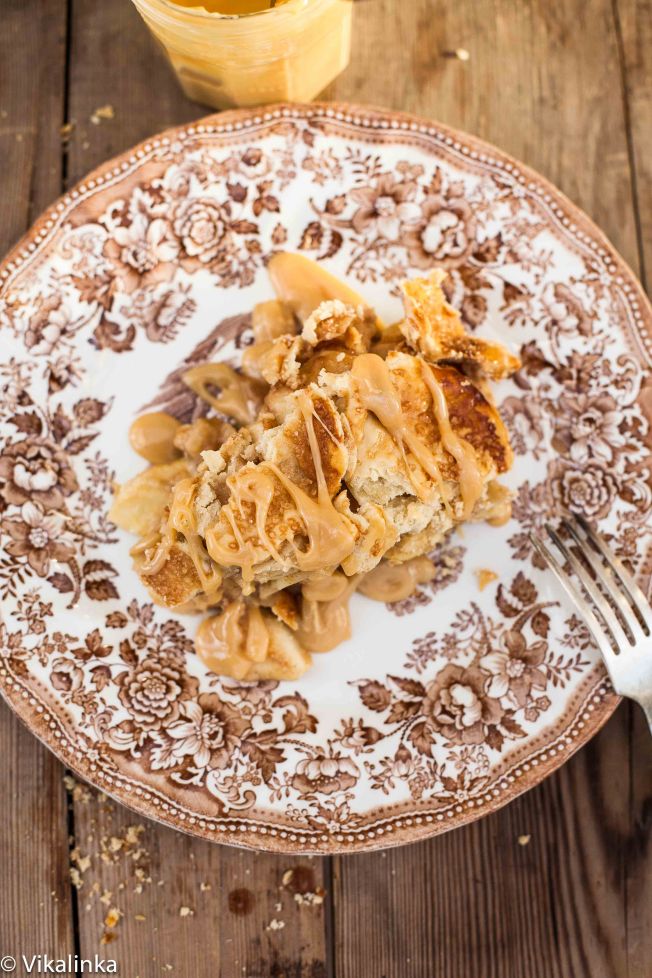
Once your pie is baked. Cool it for several hours. If you cut into it too early (like I often do) it will be very runny, however waiting a bit longer allows for all the juices to thicken so you don’t end up with an apple soup at the bottom of your pie plate. :-). Serve drizzled with a tablespoon of dulce de leche. I am sure I don’t have to tell you how indulgent it tastes. Pure heaven.

Dulce de leche Apple Pie

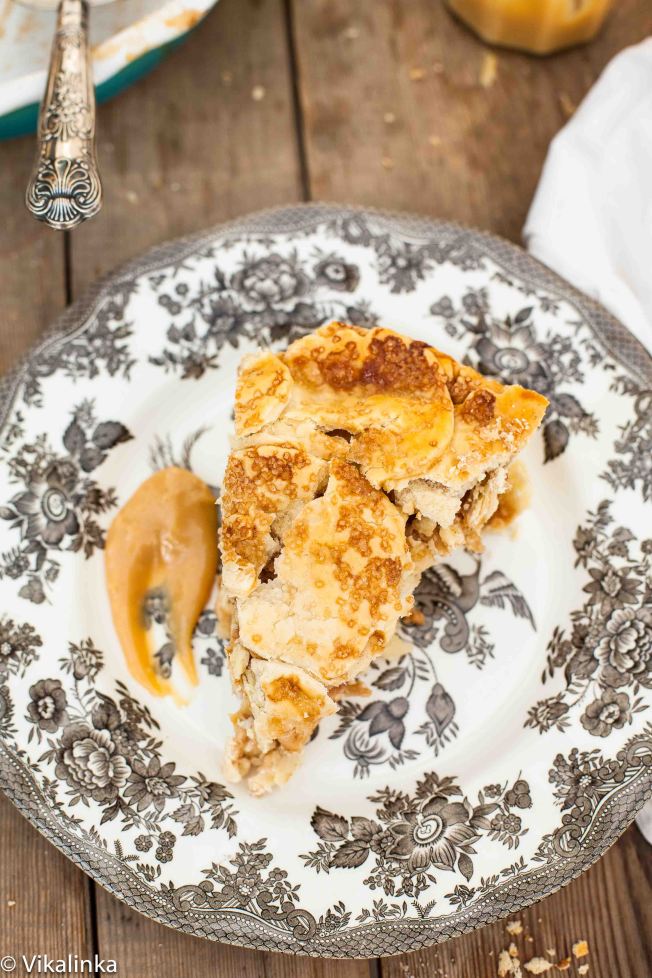
Can you see all the crumbs? I tell ya the flakiness of this pie crust is incredible!

Dulce de leche Apple Pie

Not to mention cinnamon apples in gooey dulce de leche sauce. A perfect holiday treat.

Dulce de leche Apple Pie

*Note: The amount of sugar will depend on the sweetness of your apples. Mine were very green and very tart so I used 2/3 cup sugar plus dulce de leche and it was the right call. However, you might need less sugar than I did so ALWAY taste your apples before you put them into your pie.

**Note: I always make my own Dulce de Leche. I recommend having it cooked and cooled before you get to pie making. Here is an excerpt from my post Banoffee Tartlets where I wrote about the method behind making the easiest dulce de leche.

Remove the label from the can of sweet and condensed milk and put it in the pot completely submerged in water.  Bring to a boil and continue cooking for 1.5-2 hours. Make sure your can is completely covered in water through the duration of cooking or it will explode.  Cool until it’s ready to use. When you open it you will discover that your “ole” plain can of sweet and condensed milk got transformed into glamourous and silky dulce de leche.

This step could be done well in advance. I had mine stored for a couple of weeks before I got around to use it. On a side note,  I have to brag about the fact that Russian babushkas have been making dulce de leche for years before it became trendy all over North America, so the taste of “sgushenka” is the taste of childhood for every Russian child.

Spiced Rum White Chocolate and Coconut Truffles

Standard

Spice Rum White Chocolate Truffles
I love chocolate truffles…I love  them in a very deep and real way. Seriously.  Appropriate for any food-related love, of course! Last year I pined for French truffles we used to buy every Christmas while still in Canada. Yet I have never tried to make them myself. How those two things are reconciled is beyond me! I guess I had a silly idea that they would be difficult and fiddly to make, and boy oh boy, was I ever wrong! Truffle making must be one of the most enjoyable activities ever and shouldn’t even be classified as cooking but rather a craft because it’s that simple and fun! So gather up your little ones, put lovely Christmas tunes on and get to it! If you make only one thing this Christmas let it be these White Chocolate and Coconut Truffles.

IMG_6228

Ingredients:

For 25-30 truffles

250 gr good-quality white chocolate choppedmelted truffles

100 ml whipping cream/double cream

25 gr soft unsalted butter

Spiced Rum or any other liqueur of your choice-a splash (optional)

For the coating:

200 gr good-quality chocolate, melted and slightly cooled ( I used vanilla bean white chocolate from Marks and Spencer)

100 gr shredded or desiccated coconut

Method:

Put the white chocolate, cream and butter in a pan over a low heat and stir until melted and combined, add a splash of Spiced Rum for a more complex flavour. Pour into a shallow bowl and chill in the fridge for 4 hours or until firm. (Go read a book while it’s chilling or do something else fun!)

Line a baking sheet with parchment paper and set aside. truffles 1

Scoop out a small amount of the mixture and roll it into a ball using a spoon or your hands. I opted for the latter as I wanted mine to be perfectly round. I found I had to wipe my hands between rolling each truffle because the creamy filling made them too slippery to be effective! Transfer the truffle balls to a plate and chill for 1 hour to firm up.

Once they are firm enough to handle drop them in the melted chocolate for a quick swim and pull them out with a fork, then repeat the same with the shredded coconut. I left a few of mine coconut-free as my son claims coconut to be his latest dislike! I am curious to see how true that is in the face of temptation!

You are done! Do you see how easy that is?! I am pretty sure I will be experimenting with dark chocolate very soon.

I am very weary to compare these amazing truffles with anything but if you insisted I would say they taste like a better version of Ferrero Raffaello chocolates. Oh gasp.

Serve these delightful morsels at your next Christmas party paired with a glass of bubbly and you will surely be the most popular and sought after hostess!

Spiced Rum White Chocolate Truffles

Or give them as a clever Christmas gift to your friends although I am warning you they will be very tough to part with!

IMG_6239
* The recipe was adapted from Sainsbury’s Magazine December 2012

Rogalik- My Christmas Traditions Native and Adopted

Standard

rogaliki1
One of the biggest draws of Christmas is time with family steeped in traditions. We are all creatures of habit and anticipation of something familiar is both exciting and comforting. You are probably expecting me to break into a charming little story from my childhood memories about celebrating Christmas in Russia. The truth is I didn’t start celebrating Christmas until my late teens. Among numerous holidays celebrated in Soviet Russia the birth of Christ was not one be acknowledged for 70 years! Many wonderful traditions were lost or got transferred to New Year’s Day, which became the biggest holiday of the year.

When Brad and I got married we moved away from both of our families and were very anxious to establish holiday traditions of our own to pass onto our children. Special festive food is, of course, a major part of any traditions and Christmas baking became something I dove right into! Some recipes came from Brad’s family, some from glossy foodie magazines and the one I am sharing with you today came from the Russian cookbook that was in my family for years. I was leafing through it one day when I stumbled on it. I marked it with * and jotted “Christmas” next to it. That’s how Rogalik became our family’s Christmas Tradition.

recipe
I’ve been making it ever since. For the last 12 Christmases we’ve enjoyed the taste of cinnamony walnuts drenched in honey and wrapped in flaky pastry. A cookie that has truly Russian roots but also became popular in North America through the Jewish immigrants from various Eastern European countries and known as Rugalach. Can you hear the similarity from Rogalik to Rugalach? I was also happy to learn that “rugal” in Yiddish means “royal”. Rogalik is so lovely, it’s truly fit for the King of Kings.

rogaliki 3 closeup
There are literally hundreds of recipes of Rugalach that are floating around the internet. The biggest difference between them and mine is that most of them use cream cheese to make the dough, which is not authentic at all and is rumoured to be developed by Philadelphia to help with the sale of their brand. My recipe uses sour cream and after trying all the other ones I always come back to mine. I might be partial but I believe my recipe is superior :-).
Ingredients for the dough:
Flour – 3 cups plus extra for rollingrogalik

Sour Cream (full fat)-1 cup

Butter- 3/4 cup/150gr

Vanilla- 1tsp

Egg (beaten)-1 for brushing

Ingredients for the filling:

Walnuts (chopped)-1 1/2 cupsRogalik

Sugar-1 cup

Honey-1/4 cup

Cinnamon-1 tsp.

Method:

Preheat your oven to 350F/180C and line your baking sheets with parchment paper.

Whip your softened butter together with sour cream in a large bowl. Add flour in small portions and continue mixing. Empty the contents of the bowl on floured surface and continue kneading until you have smooth and pliable dough adding a bit more flour if sticky. Cover and let sit for 10 min.

While your dough is resting chop the walnuts finely or process them in a food processor, mix with sugar and cinnamon and set aside. Make sure your honey is spreadable, heat if needed to achieve the right consistency.

Divide your dough into 4 parts and rolls out each individually into a circle. The dough shouldn’t be thicker than 1 cm. Brush honey on it and divide into 16 even triangles.

circle divided

Now sprinkle 1/4 of the nut/cinnamon mixture on your circle. My son came to help me with this important business but got bored quickly and left me to my own devices.

mitchell's hand
The next step is the funnest of them all. That’s where the famous rogalik takes it’s shape. Roll up each triangle starting from the wide end towards the centre of the circle.
one rolled up
Arrange the cookies on a parchment lined baking sheet, brush them with the egg wash and bake them for 25-30 minutes. I strongly recommend using the parchment paper because the delicious and gooey filling will leak out a bit and turn into caramel. If you don’t use parchment paper your rogalik will get glued to the baking sheet and will make it stressful to remove.
unbaked
Once baked remove them from the baking sheet to the wire rack while still warm.

rogaliki done
These little beauties take a bit of work but I get a profound sense of satisfaction and pride when they are done and put away in lovely Christmas tins. I am even happier when I get to sit down and enjoy one with my tea.
IMG_6037
My little girl loved them as well this year! Bonus!
Vika eatingRugelach  or Russian Rogalik

Christmas Dinner {Part 3}- Herb, Chorizo and Fig Stuffing

Standard

Are you set on your Christmas dinner menu already? If you are anything like me you’d be changing things the last minute, adding to already existing ones and re-arranging everything from top to bottom. It’s impossible for me to stick with just one recipe for something, I get so distracted by the variety available to me and I want to try them all!
This post is about a stuffing recipe that I invented on a spur of the moment and surprisingly enough it turned out to be delicious. In fact, my husband said he could eat it alone as a meal! It wasn’t something I thought about or planned. I was simply cooking a pork roast one Saturday and I kept adding more and more sides to it. This recipe was born!
You know I actually already have a perfect stuffing recipe that I’ve been making for holidays for a while. It’s hard to beat perfection and why would I mess with it! More importantly why would I mess with stuffing when everyone knows it has a potential to taste like a bland clump of bread! The answer is I get bored when things are the same and I need to spice them up every once in a while. Also when you work with ingredients like these how can it possible not be fabulous?!

Another reason for this experimentation is I love cooking with Spanish sausage- chorizo (and I had quite a bit of it kicking around in the fridge that needed to be used), it gives the dishes such lovely flavour and zing! It also turns everything it comes into contact with yellow or orange which is like a bit of sunshine that the Spaniards share with all of us Northerners! I was curious to see if it would work with this very non-Spanish meal.
stuffing prep
Like I said this was not a pre-meditated affair so I had to use ingredients I had on hand. Next time I make it I think I am going to add chestnuts for more texture!
In my humble opinion, there are a few ‘must have’ components of a tasty stuffing besides bread or rice- a sausage of sorts, a variety of herbs, fresh or dried fruit and nuts. All things combined will give us flavour, texture, a bit of spice and comfort!
Ingredients:

  • Bread -stale French baguette- 2/3 or 200gr
  • Butter- 1tbsp
  • Onion-1 medium
  • Garlic-2 cloves
  • Apple-1/2 (grated)
  • Chorizo- 150gr
  • stuffing prep 2
  • Dried Figs-10 (chopped)
  • Sage-2-3 sprigs (leaves only)
  • Rosemary-2-3 sprigs(leaves only)
  • Pine nuts-1/4 c.
  • Stock (beef, pork or vegetable)-1c.
  • Egg-1 large (slightly beaten)
  • Salt and Pepper to taste

Method:

Preheat your oven to 350F/180C and butter an oven proof dish.

Cube your bread and put it in a large bowl. Chop up your onion and herbs and saute them in the frying pan with butter on a medium heat until translucent but not coloured for about 5 minutes, add garlic and cook for a minute longer. Transfer to the bowl with bread.

Dice chorizo and figs and add them to the bowl with stuffing. Add all the remaining ingredients except the egg. Mix well together adding salt and pepper to taste. Finish off with the beaten egg, mix the stuffing again and transfer to the buttered baking dish.

Unbaked stuffing

Bake in the oven for 30-35 minutes until puffed up and golden.

cooked stuffing

This stuffing has a slightly sweet and spicy taste. It’s crazy flavourful and although it doesn’t  have that traditional and familiar Christmassy taste it’s lovely nonetheless and goes especially well with this pork roast.

I hope you are adventurous enough to add this newbie to your Christmas table. I promise you won’t regret it and your guests will be so impressed with the bold and innovative combination of flavours!

Christmas Dinner {Part 2}-Potatoes a la Russe and a Love Story

Standard

Before I share this recipe with you I would like to warn you that a floodgate of sentimental mush is going to come forth with it. It is not  just a recipe it’s a story of me and my then-boyfriend-now-husband Brad and our journey of bringing two very foreign lives together in order to make sense of our future.

When I moved from Russia to the States I often got asked what kind of food we ate back in the Motherland but if my answers didn’t include cabbage or vodka they only led to disappointment from my college classmates. To put an end to all the confusion I went to Barnes and Nobel one day and purchased a very thick and legit looking Russian cookbook-The Art of Russian Cuisine by Anne Volokh to arm myself with a variety of authentic Russian recipes to share.

Potatoes a la Russe was one of the them although I have to admit it existed in the book under a different name perhaps slightly more prosaic and much less French.

You are probably wondering where exactly love comes into all this food talk. Well, food and love are always connected- you can’t possibly cook great food without putting love into it AND everything tastes so much better when you are in love.

The story takes us to my college days when Brad and I were still dating . We were very young and in love and completely broke. We had no money to go on all the thrilling, mind-blowing dates we often saw in rom coms. We had to get creative! Cooking together in a small student kitchen on our college campus was one of our favourite pastimes. It was so much fun to “play house” with him and also introduce him to some of the dishes I grew up with, then watch his reaction. Thumbs up or thumbs down. Not all ethnic recipes translate well to North American tastes but this particular one I am about to share with you does. I am pretty sure Potatoes a la Russe made Brad fall in love and realize it was unlikely he could live the rest of his life without those potatoes…and me.

So be prepared this dish has magic properties. You can even say it’s a Love Potion of sorts. The most beautiful thing is that it’s dead simple and requires very basic ingredients.

potato bake ingredients

Ingredients:

Potatoes-4-5 medium

Onion-1 medium

Mushrooms- 100gr

Parsley-4-5 sprigs

Creme Fraiche or Sour Cream

Butter-3 tbsp.

Salt and Pepper

Hard and Sharp Tasting Cheese like Parmesan (I used Pecorino as that’s what I had in the fridge)

Method:

sliced potatoes

Preheat your oven to 350F/180C. Butter an oven proof dish and set aside. Heat your non-stick frying pan and melt a tablespoon of butter into it. I can already predict that people will want to substitute butter with oil or margarine and I am going to stop you in your tracks. Don’t do it! Butter is where your flavour comes from. Don’t mess with perfection!

Slice you potatoes (not too thin) and fry them in batches until golden, season with salt and pepper. Take them off the heat once they are nicely coloured even if they are still hard on the inside, we will bake them later till doneness.

sliced mushrooms

Now slice the mushrooms and fry them in the same pan over a medium heat adding more butter and seasoning them with salt and pepper. Chop up your parsley and sprinkle all over mushrooms and cook 2-3 min. longer until all the liquid from the mushrooms evaporates. Set aside.

sliced onions

Slice the onions and fry them as well. Now all of your ingredients are ready for layering.

The layering of this dish is very similar to lasagne, so I am confident you will master it. First arrange your slices of potatoes on the bottom of your dish and scatter onions on top of them. layering 1
Next layer mushrooms.
layering 2
And then repeat all the layers one more time finishing with a thin layer of creme fraiche.
layering 3
Finish it off with sprinkling of grated sharp cheese.
layering 4
Bake in the oven for 25-30 minutes until heated through and the cheese is golden.
potato bake final
Every beautiful thing is essentially simple but simple doesn’t have to be dull. This potato dish is a proof that a few great quality ingredients put together in a loving way can produce flavours that are far from plain. The mushrooms, potatoes, onions and butter together are so earthy, gratifying and deliciously nostalgic of childhood and simpler days you would want to eat it every time you are faced with the harsh reality of the world. Comfort food indeed!
P.S. In no way this post was promoting or supporting”emotional eating”:-). All the beautiful food should be eaten in moderation and enjoyed with friends and family, they are the “real” mood lifters, not butter!

Christmas Dinner- Roasted Pork Leg with Port Gravy {Part 1}

Standard

Believe it or not but this entire post in 3 parts was inspired by my most recent acquisition from the Greenwich market- this antique meat carving set. The vendor kept warning us about the sharpness of the blade so I had very little choice but to buy a chunk of meat and test it for myself!

Also, I am becoming very keenly aware that Christmas is very fast approaching and I would love to offer you some wonderful options from the Vikalinka’s kitchen for your festive dinner. This post is all about the meat and gravy but in the subsequent parts I will be telling all about your sides like potato and stuffing. So stay with me for the whole run!

I don’t know how you feel about roasts but I’ve always been a fan. Nothing is easier and more satisfying than throwing a big hunk of meat in the oven waiting for a couple of hours and then feasting on it for days and making your house smell heavenly in the process! My love for them only grew deeper when we moved to England where a Sunday Roast is a century-old tradition. When it comes to roasting meat I trust my favourite chef (who also happens to be a Brit), Jamie Oliver, more than anybody else in the world, even my own mother. I’ve looked through at least 6 of his recipes for different cuts and this is what I came up with- a hybrid of sorts but delicious and tender nonetheless.

Ingredients:

Pork leg- 6-7 lbs

Carrot-2 medium

Celery-2 stalks

Onion-1 medium

Sage and Rosemary- 2-3 sprigs of each

garlic-3 cloves

salt and pepper

For Port Gravy:

Flour-1 tbsp.

Port-1/4 c.

Stock- 2 c.

Method:

Preheat your oven to the highest temperature.Take your pork leg out of the fridge, rinse it with cold water and pat dry with a paper towel. Lay it on the cutting board skin side up and make slits on the skin with a sharp knife. Rub the meat with salt and paper. Take your herbs and vegetables and roughly chop them up while leaving garlic whole but smashed. Put them in the middle of your roasting pan and place the pork leg directly on top of them like that.

Place the pork in the oven and cook at 475F/250C for about 10-15 min allowing the skin to blister up, then turn the temperature down to 350F/180C and cook for 2 hours or until the internal temperature is 145F/60C basting it with the pork drippings half-way through. If you don’t have a meat thermometer I highly recommend buying one. They are inexpensive and a great way to make sure you don’t overcook your meat and end up with something that tastes like a shoe.They are quite important as oven temperatures vary so much that going by the internal temperature of your roast is much better than the cooking time in the recipe. I suspect that the reason many people stay away from roasts is because of the memories of dry and overcooked meat from their childhood.

When your roast is done. It should look similar to this one.

Remove the roast from the pan and set it aside. Cover it with foil if you plan on eating later. On the side note, once you take the roast out of the oven and cover it, the temperature will rise a bit more as the the internal cooking is still happening. That is why it’s important to watch the temperature and take it out of the oven sooner rather than later.

Next on the list is gravy. I cook mine in the same pan where I cooked the roast. This way you can use all the drippings and the burnt bits. That’s where the flavour is going to come from…well that and port, of course!

Sprinkle your flour over the pan and blend it in the fat. (I drain most of the fat but leave about a tablespoon.) Remember all the herbs and vegetables that were hidden under the roast? They should be nice and very soft right now. Mash them with the potato masher and blend everything together. The mixture will be very chunky but we won’t worry about it right now. Add port and let it cook for a couple of minutes, let the flavour seep into the gravy and then add the stock. Turn the heat up and allow the gravy to thicken, just watch it bubble away and enjoy the aroma that rises from it. When the gravy reached the right consistency take it off the heat and strain into a gravy dish leaving all the vegetable bits behind.I can’t begin to tell you how much the roasted veggies and port in this recipe improve and add depth to the overall taste of the gravy. The sweetness that port offers works particularly well with the pork. Please, please, please give it a try! I promise you won’t regret it! And when you do try it let me know your thoughts. Also, don’t forget to come back for Part 2 and 3 of this fabulous meal.

It was such a hit with the whole family that the last words of my 6-year old before bed were: “Mummy, can I please have more of that pig tomorrow?”